A computer that loads slower than a snail is not at all a good thing. If your PC works the same, stop cursing and waiting in vain. There are still a lot of things you can do if you need help repair your slow computer. And the good news for you is that you do not need any kind of hardware upgrade just to speed up your PC once again.
I. HARD DRIVE DEFRAGMENTATION
One of the reasons that your PC can be running slowly is that the files in the hard drive are scattered. This setup makes it harder for the hard drive to access information. To speed up your PC, it is a good idea to run a disk defragmenter at least once a month. Running the defragmenter can take two to four hours so you have to be patient when doing this.
How-To:
Step 1:
Turn off screen saver. This step is very important and necessary because on some machines if the defragmentation process is interrupted, it can cause problems. Also close all programs running. This includes the programs that run in the background such as your antivirius software. Also, it is very important not to use the computer during this time.

Step 2:
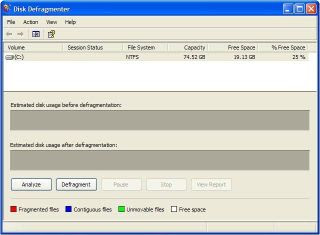
Open the Defrag utility. The defrag utility is located in your start menu. To access it click Start -> All Programs -> Accessories -> System Tools -> Disk Defragmenter.

This is what the defrag utility looks like.


Step 3:
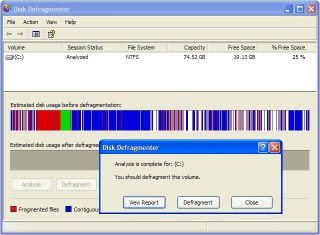
Click the 'Analyze' button which is located in the bottom left corner of the window. Then once the analysis is fully completed it will give you an option of whether you want to view a report or if you would like to defrag.

Step 4:
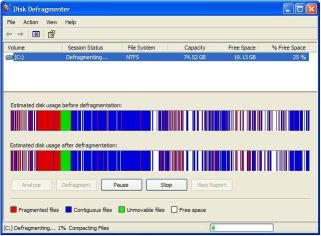
Click the Defragmenter button. This is going to start the defragmentation process, during which time it is recommended to go do something, this will take anywhere from thirty minutes to several hours. Usually most people do this overnight while they are sleeping.

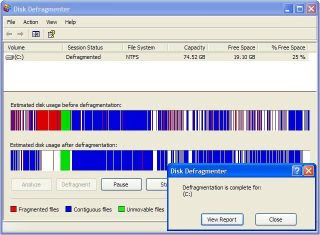
During the defragmenting the area labeled 'Estimated disk usage after defragmentation:' will start off being the exact same as before and it will start to change slowly over the duration of the time.

Step 5:
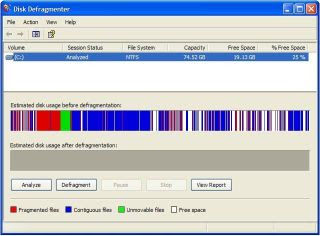
Once you receive the "Defragmentation is complete for (drive)" then you are finish with the defragmentation process. But, look at the disk usage after the process and if you see many different sections of blue separated by whites (25 or more), then i would suggest that you run the defragmenter again. Remember that you must close all programs and don't use your computer during the process, and if you really wanted to do a little better job then run the defragmenter in safe mode. To access safe mode you will need to press F8 while starting your computer to get to the boot screen. I decided that I needed to run the utility again due to there being many fragmented pieces scattered over hard drive.

Step 6:
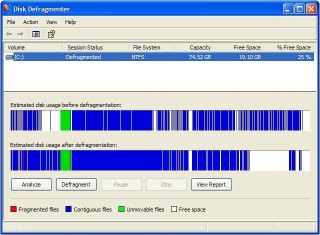
From here on are optional steps. If you decide to run the defragmenter again then just repeat steps 1 -5 again. The following picture is the result after running the defragmenter for the second time. As you can see if you compare the result of the first and second then you can tell that there is a big difference, this time the defragmenter moved more files closer together which eliminated much of the fragmented pieces. As you can see at the beginning of the drive there is most all of the data and toward the end is free space, this is ideal since it takes less time for the computer to access the inner part of the hard drive. This is where I would have stopped, but i wanted to test out a couple theory's that I remember being said. First is that it is best to defrag more than once, which I just proved since the result is much better. The second theory that i heard was that it is better to run in safe mode which i will be testing next.

So the run the defragmenter in safe mode you must first restart your computer and press F8 at the appropriate time, tapping F8 will work too since it is hard to time. Once logged back into windows, this time in safe mode you should notice that it says 'safe mode' in all the four corner of your screen. Now that you are logged back into windows, repeat steps 1-5 to begin the defragmenter. you will notice that this time the amount of unmovable files is smaller than before, this is because there are barely any processes running since its in safe mode.

II. SPYWARE REMOVAL
Even if you think your computer does not have any kind of spyware installed in it, there is a lot of chance that it has spyware already. This is especially true if you use the PC for surfing the Internet most of the time. As you know, the spyware can make your PC run slowly. Hence, remove the spyware in your computer system through the help of spyware removal programs that you can find in the Internet.
I will give you some very useful tricks and tips to remove Spyware and Viruses for good! Follow closely:
Steps to Remove Spyware, Viruses, and Adware
1. There are many types of software available today that claim to remove spyware off our system, but which one REALLY does the job? What you need is software that not only will remove spyware, but TOTALLY removes it for good and keeps it off. After searching for the best of the best, here is THE BEST: Panda Online Scan. Why? It does not constantly run on your system, slowing it down and using bunches of memory!
In other words, it runs from Panda on the web, then searches your whole system, will remove spyware and other bugs, then gives detailed info on the bug and tells you how to keep it off your system! Here is the address to get started:http://www.stopspywareforfree.com/scan.html It only installs a few plug-ins to run on your system, and no full installation!
2. Check your system services and systray items! The biggest mistake people make is never checking what programs are running in the background or memory of the system. A key step to remove spyware from your system is knowing this. Without knowing these things, you probably have bugs running on your system, and never know it! Why? They like to hide! Download and install a program called HIJACK THIS. It tells you exactly what is running and what is not running so you know exactly what might be hiding behind closed doors! Here is the address for this: http://www.stopspywareforfree.com/hijackthis.html
3. Shutdown the SYSTEM RESTORE! (Windows XP) Spyware and Viruses attach themselves to your system's restore files. This is an easy way for them to hide, even after you reinstall Windows! Right click on 'MY COMPUTER', then click on 'Properties'. Look for a tab on top called 'System Restore', and click there. Check the box that says 'Turn off system restore on all drives'. Click 'APPLY', then 'OK'. That's it!
4. Use an Anonymous IP address when surfing the web! This is a huge step in keeping bugs off your system forever! Bugs get onto your system and retrieve info about you by capturing your IP address. Your IP address tells everyone who you are, where you're located, your system info, what kind of Windows you use, your browser, etc. An anonymous IP hides your IP by using an Anonymous address and makes you invisible to everyone, including Spyware and Ads! Here is an address to a good proxy list:http://www.stopspywareforfree.com/proxylist.html
Please follow these instructions carefully for Microsoft Internet Explorer:
- Scroll down on the page from the above link. On the list, look at the numbers listed under IP:Port Host name. Make sure the uptime on the right is at least 97 to 99 %.
- Go to the Control Panel in Windows.
- Open up ' Internet Options'.
- Click on the 'Connections' tab on top.
- Click on 'LAN Settings'.
- Put a check-mark where it says PROXY SERVER.
- In the Address box, copy and paste the IP address listed on the proxy list (for example: 148.244.150.58 - These are the numbers shown BEFORE the ':' (semi-colon).
- Copy and paste the port number into the PORT box (for example: '80' - the number immediately after the semi-colon).
- Click OK, and OK again to close, and close everything.
- Go ahead and open up your browser and try surfing the internet to test.
Thats it! You are now surfing invisibly! For the Firefox browser:
- Open up the browser and go to 'TOOLS' then 'OPTIONS'.
- Go to 'GENERAL' on the left, then click the 'Connection Settings' button below.
- Choose 'Manual' proxy config from the choices.
- Check the 'use the same proxy' checkbox.
- In the 'HTTP Proxy' box, copy and paste the anonymous IP, and the PORT number in the PORT box (remove the zero first).
- Click OK, then OK again to close.
- Now test your browser by surfing the web.
You are now invisible.
**note - if your browsing gets super slow or has a problem, look for another IP and Port number on the list and try again. Most of the time the proxies from Mexico work best. Happy surfing! The free proxy list can be found here: http://www.stopspywareforfree.com/proxylist.html
5. Download and install the new FIREFOX browser!
Please get rid of Microsoft Internet Explorer on your system! It is like a pipe that feeds Spyware, Ads and Viruses onto your system. There are just too many holes there letting everything in. Mozilla is a fairly new company that introduced a new breed of browser that blocks popups, and tries hard to keep these bugs off your system. It has very few or even NO holes or pipes to let the bugs in! Many people use it for this very reason, and it has a great look, better speed, and lets you change the theme of it! Awesome!
III. MEMORY EXPANSION:
If the reason for your slow computer performance is too much files or too much programs operating every now and then, it is a good idea to expand the memory of your hard drive. Doing this is as simple as opening the memory slot to give way to the installation of the new chip. However, this can be a very complicated task for an amateur like you so better seek the help of a technician for this.
So, here are the simple instructions to follow:
1. Make sure you're logged in as an administrator - you will not be able to change certain things on your computer without be logged in under this (most likely you will already be logged under administrator).
2. Right click on My Computer, scroll down, and right click on Properties.
3. A new screen will pull up and will say General. Go over 3 more tabs and left click on Advance.
4. Next, left click on Settings (located in Visual Effects, Processor Scheduling, Memory Usuage, and Virtual Memory). Once you have clicked on Settings, this should bring up your performance options.
5. Now, left click the third option down called Adjust for Best Performance (located in Visual Affects).
6. Next, left click the next tab over labeled Advance.
7. Now, change the top and middle sections to Programs by left clicking on the choice labeled Programs in each section.
8. On the bottom section, left click Change.
9. On the next page that pulls up, left click C:.
10. Now, left click Custom size.
11. Increase to double what is listed for initial size, making sure the number you type in is in multiples of twelve or your computer will crash. For maximum size, just triple the number.
12. Now, left click Set and then left click OK.
IV .BACKGROUND PROCESSES DESACTIVATION:
There are programs in your computer that can be working in the background without you knowing them. These programs, despite you not using them, can suck up your computer system and thus slow your computer down. Check the processes tab on your computer and end the task of the programs that you are not using. If this sounds like a complicated job for you, a registry cleaner will help you do the job. Most of today's registry cleaners have a feature to effectively handle the background processes in your computer.
To check for a particular process, you open the Windows Task Manager. This is done by hitting Control + Shift + Escape on the keyboard. Click the processes tab when
the task manager appears, and you should see something like the following:
Qttask.exe - This is the QuickTime system tray and is not at all needed.
To disable it: Right click the QuickTime icon in the system tray and choose "QuickTime Preferences"
In the preferences window that appears click the "advanced" tab and uncheck the tick box next to "Install QuickTime icon in system tray" then click "ok"
Jusched.exe - This is the Java Automatic Update process and is not needed, most people just prefer to manually download new JRE releases
To disable it:
Click the start button, and then open the control panel. Double click on the "Java" icon
In the Java windows that appears click the "Update" tab then uncheck the tick box next to "Check for updates automatically. Then click OK.
WISPTIS.EXE -This executable runs as a system service that provides pen-data collection for other components of the SDK. When a component needs to interact with the pen (for example, to collect ink or to detect gestures), this executable is spawned as a service to communicate directly with the input device. On a Tablet PC,
Wisptis.exe interacts with the digitizer, whereas on a desktop it interacts with the mouse as well.
Wdfmgr.exe This is included with Windows Media Player 10 and adds support for windows user mode drivers. It's not at all needed and can be disabled.
Click the start button and then click on "run". In the run box type "services.msc" then click OK.
In the Services window that appears scroll down to find the "Windows User Mode Driver Framework" service. Double click on it.
In the properties window that appears click the box to the right of the "startup type" text. Choose disabled. Now click the "stop" button. Then click "OK" and close the services window.
V . WINDOWS REGISTRY CLEANUP:
This is the best approach to speed up your slow computer. It is quite unknown to many that when the computer registry has a lot of entries in it, the computer tends to become slower. With numbers of entries of deleted programs in the registry, you need to free the registry with them.
There are two options to clean the registry. One is manual removal and the other is automatic. The first one is not advisable because if you accidentally delete an important entry, you can make your whole computer system to fail. Hence, automatic removal with the help of registry cleaners will be the best solution to clean your windows registry. There are a lot of applications in the Internet but be careful to choose only the most reliable and credible program.
True enough, there are tons of things you can do if you need help repair your slow computer. So what still are you waiting for? Stop your suffering today and act on making your computer perform better and faster.
2 comments:
There are few tips which is mentioned on this article that you can utilize to make your pc faster than it was
The blog and data is excellent and informative as well.
go right here
Post a Comment